The Authorize.Net Payment Module connects your Miva store to an Authorize.Net merchant account so you can accept and manage payments directly through your Miva storefront.
With the module, customers can enter their payment information during Miva checkout without being redirected to another website. The integration supports credit card payments and Electronic Debit (eCheck), as well as MivaPay Vault for saved payment methods.
For credit card payments, the module uses Authorize.Net Accept.js to securely send payment information from the shopper's browser to Authorize.Net for tokenization. This helps prevent raw credit card data from being submitted to the Miva server.
To use the module, you must have an active Authorize.Net merchant account and the account credentials needed to connect it to Miva.
Installing the Module
- In the Miva admin, click Settings in the lower-left corner.
- Click Modules.
- Type authorize in the module search bar.
- Locate Authorize.Net and click Install.
After the module is installed, the Payment Settings page opens to the Authorize.Net tab.
Configuration
Login ID: Enter the Login ID for your Authorize.Net account.
Public Client Key and Accept.js
For credit card payments, Miva uses Accept.js to send payment information from the shopper's browser directly to Authorize.Net for tokenization. Miva can then process the transaction without the raw credit card number being submitted to the Miva server.
Public Client Key: Enter the Public Client Key from your Authorize.Net account. The key is used as part of the Accept.js integration to securely transmit the shopper's payment information to Authorize.Net.
How to get your Public Client Key
- Log in to your Authorize.Net account.
- Navigate to Account > Settings > Security Settings > General Security Settings > Manage Public Client Key.
- Generate or obtain your Public Client Key.
- Return to the Authorize.Net settings in Miva and enter the key in the Public Client Key field.
Once the Public Client Key is configured, Miva will use Accept.js during checkout.
Transaction Key / Confirm Transaction Key: Enter the Transaction Key from your Authorize.Net account in both fields. The Transaction Key is used to authenticate transaction requests that Miva sends to Authorize.Net.
Mode: Choose which Authorize.Net environment the store will use:
- Production — Use this for a live store processing real transactions.
- Sandbox — Use this when configuring and testing the integration with an Authorize.Net sandbox account.
Transaction Data: Select the level of transaction data sent to Authorize.Net. The available options are Basic, Level II, and Level III. Level II and Level III can send additional transaction information, including item-level, tax, and purchase-order data. Sending this additional data on qualifying transactions may help lower interchange fees.
Duplicate Window Duration: Sets the amount of time, in seconds, that Authorize.Net checks for duplicate transactions. This helps prevent the same transaction from being processed more than once.
Authorize.Net compares transaction requests such as authorizations, captures, voids, and refunds. If an identical request is submitted within the specified time window, the subsequent request is treated as a duplicate.
Transaction Description: The description included with transactions submitted by your store.
CVV2 Message: The message shoppers see when they're asked for their card's CVV2 security code during checkout. You can use this field to explain where to find the code or why it's needed.
Charge Method: determines when an authorized payment is captured.
Online (Automatic Capture): The payment is authorized and captured as part of the transaction.
Offline (Authorize Only, Capture Later): The payment is authorized during checkout but is not immediately captured.
To capture an authorized payment later, edit the order in the Miva admin and click Capture.
Note: The selected Charge Method also applies to applicable orders created manually in the Miva admin.
Test Mode: Enable this option when performing test card transactions.
Your Authorize.Net account must also be configured for testing.
Available Payment Methods: Select the payment methods you want to make available to shoppers during checkout.
The available options depend on the payment methods supported by your Authorize.Net account.
Electronic Debit is Authorize.Net's eCheck payment option. When enabled, shoppers can pay using checking account information instead of a credit card.
When a shopper selects Electronic Debit and continues to payment, checkout displays the fields needed to complete an Electronic Funds Transfer (EFT).
Electronic Debit must be enabled for your Authorize.Net account before you can offer it during checkout.
Display CVV2 Field
Enable Display CVV2 Field for the applicable credit card payment methods when you want the CVV2 field displayed during checkout.
Require CVV2 in Administrative Interface: This setting applies to applicable orders created or edited in the Miva admin.
When enabled, a CVV2 value must be entered in the Authorize dialog.
When disabled, the CVV2 field may still be displayed, but it is not required.
Troubleshooting Accept.js
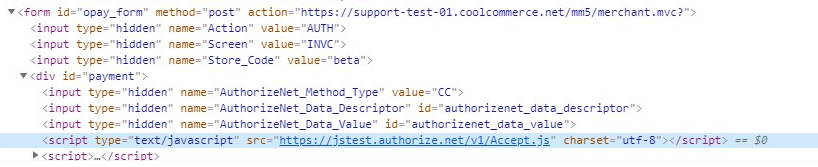
There isn't a visible indicator during checkout that shows whether Accept.js is active. If you need to verify that the expected Accept.js code is loading, check the page source on the final checkout step.
Most merchants will not need to do this during normal configuration.
- In Google Chrome navigate through your storefront checkout to the final payment step.
- Right-click anywhere on the page and select View Page Source.
- In the page source, press Command+F (Mac) or Ctrl+F (Windows) and search for
https://js.authorize.net/v1/Accept.j2.
If that exact string appears, you’ve found the Accept.js script reference the documentation is talking about.
If you have entered a Public Client Key but cannot confirm that the expected Accept.js integration is loading, contact Miva Support for assistance.