The FedEx web services module allows you to integrate FedEx Web Services into your Miva store, enabling shipping label generation directly through your FedEx account. The configuration settings are applied globally across all FedEx shipments but can be customized at the individual product or order level when needed.
You can switch between two modes: Production Mode, which generates live shipping labels billed to your FedEx account, and Test Mode, which produces sample labels for testing purposes that are not valid for actual shipments.
Important: FedEx Web Services Retirement
FedEx retired its legacy Web Services (SOAP) APIs on June 1, 2026.
Merchants using Miva's previous FedEx Web Services integration should migrate to the FedEx Shipping module, which uses FedEx's current REST APIs. Failure to migrate may disrupt shipping rates, shipment processing, label generation, and other FedEx services. See the FedEx Shipping documentation for setup and configuration details.
Enabling FedEx Web Services
1. Go to PATH: Settings > Shipping Settings
2. Click on the ( ... ) Ellipsis drop-down then click on Add / Remove Modules > Locate FedEx Web Services
3. Click Install under FedEx Web Services.
Once installed, the FedEx Web Services tab will be available on the Shipping Settings screen.
Configuring FedEx Web Services
Navigate to the FedEx Web Services tab by going to PATH: Settings > Shipping Settings > FedEx Web Services tab. Note that the settings in this section are global and will apply to all FedEx packages that you ship. You can over-ride some of these settings:
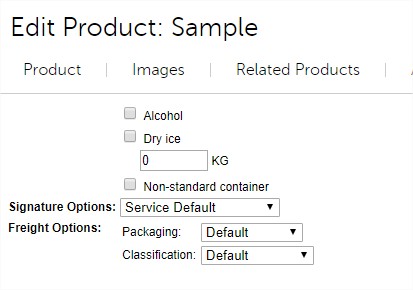
- At the product level: Catalog > Products > Edit Product > FedEx Web Services.
- At the order level when you want to Generate a Shipping Label.
FedEx Server: Enter the address of a:
- Test server: A FedEx test server that allows you to get rates and print sample labels.
- Production Server: A FedEx production server that allows you to get rates and print real labels that are billed to your account.
FedEx Account Number: Enter the number you were given when you created your FedEx account.
Meter Number: If you enter a FedEx account number and click Update, the screen will be updated with a meter number. But if FedEx has given you a meter number, you can enter it here.
Generate New Meter Number: This link only appears after you have entered a valid FedEx account number and clicked the Update button. In general, you would never need to use this link unless instructed by Miva Merchant or FedEx.
Rate Type: Affects the rates that are displayed to customers. Note that this is not necessarily the rate that you (the shipper) will pay. For example, you could display FedEx list rates to customers, but your account rates might be lower.
- Account: Customers will see the rates that are associated with your FedEx account.
- List: Customers will see the FedEx standard retail shipping rates.
Currency Type: The currency that you are using for the declared value (usually the order total).
Delivery Signature Option: This is a global setting, but it can be over-ridden:
At the product level: Catalog > Products > Edit Product > FedEx Web Services.
When you are printing a label: Order Processing > Edit Order > Generate Shipping Label > Signature drop-down list.
Adult: the package can be signed for by anyone over 21.
Direct: the package must be signed for by the person it is addressed to.
Indirect: the package can be signed for by anyone at the receiving address.
No signature required:
Service default: Businesses that ship an enormous number of packages using FedEx may have a kind of "account default" for the signature option. For example, a company might want every package to have at least Indirect signature. If an employee forgets to set the signature option on a package, the signature option will automatically be set to Indirect. However, this kind of account default is very rare. For the vast majority of companies that ship with FedEx, setting the signature option to Service Default means that no signature will be required.
Drop Off Type: Describes how you are going to get your package to FedEx. The option that you select will change the shipping cost that is shown to the customer. This is a global setting, but you can over-ride it when you print a label (Order Processing >Edit Order > Generate Shipping Label > Signature drop-down list.)
Drop at BSC means you will leave the package at a secure, Business Shipping Center, like a FedEx, UPS, DHL, or any third-party location that accept packages on behalf of carriers. Drop at station means that you will leave the package at a FedEx world-wide service center.
SmartPost Hub ID: A SmartPost hub is a processing center for SmartPost mail (see http://en.wikipedia.org/wiki/FedEx_SmartPost). If you are using SmartPost, FedEx will give you a hub id to enter here.
Note: When One Rate is enabled, only One Rate shipping methods will be used. Standard FedEx rates will not be combined or displayed alongside One Rate options.
Zebra Thermal Printing:
Use Zebra Thermal Printing: PR8 Update 8 added the ability to print adhesive backed address labels using a Zebra or Zebra compatible printer. A Zebra compatible printer can be used with Endicia, FedEx, UPS, and Canada Post, but currently not with the USPS module.
Requirements:
- Your browser must have Java enabled. See http://java.com/en/download/help/enable_browser.xml.
- You must have a Zebra or Zebra compatible printer that can print .zpl.
- Your store must be running PR8 Update 8 or later.
MivaPrint Q Desktop App:
MivaPrint Q allows you to print ZPL thermal labels directly from the Miva admin. Once installed on your local computer, which must be connected to a ZPL‑compatible printer (either directly or over your network), MivaPrint Q will automatically poll your Miva store for any pending shipping labels and send them straight to your printer. MivaPrint Q, a desktop application available for both Windows and Mac.
Learn more and download MivaPrint Q
Shipment Defaults:
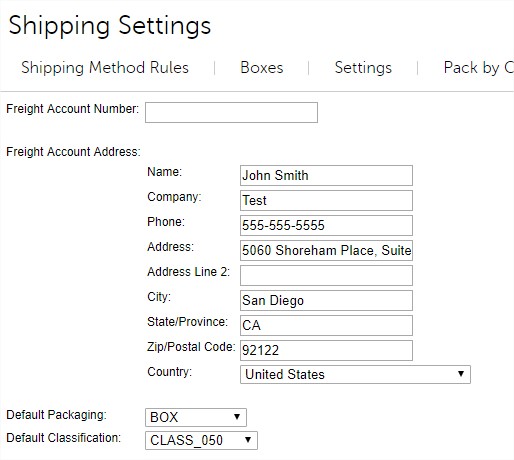
Ship From: This address, and the customer's ship to address, are used to calculate shipping charges. This address will appear on your shipping labels.
- Alcohol Flag: The alcohol flag must be checked if the order contains alcohol. If you check this box, the rate you get from FedEx will include "adult signature required". Because this is a global setting, you should only check this here if every product that you sell includes alcohol. If only some of your products include alcohol, you should set this flag on a product level (Catalog >Products > Edit Product > FedEx Web Services Options tab).
- Inside pickup: You should check this box if you at least occasionally ship packages that are over 150 pounds. If a shipment is over 150 pounds (151 plus) a FedEx employee must enter your building to get the package. This is a global setting and cannot be overridden at the product level, but it will only be triggered if the shipping weight is over 150 pounds. If triggered it will affect the rate.
- Inside Delivery: You should check this box if you want packages weighing more than 150 pounds to be brought into the recipient's building. This is a global setting that cannot be overridden at the product level, but it will only be triggered if the shipping weight is over 150 pounds. If triggered it will affect the rate.
- Non-standard Container: Select this option to indicate that your FedEx shipment is packaged in a non-traditional or irregularly-shaped container (e.g. a pail). A surcharge may apply. Only check this box if all the products that you ship meet this description, otherwise you should enable this at the product level (Catalog > Products > Edit Product > FedEx Web Services Options tab).
- Dry Ice Flag: This flag must be checked if every product that you ship includes dry ice. If only some of your products contain dry ice, you should enable this option at the product level ( > Catalog > Products > Edit Product > FedEx Web Services Options tab). The rate that you get from FedEx will automatically include the "dry ice surcharge". Some FedEx services will not be available if you are shipping with dry ice. For more information, see: http://www.fedex.com/us/service-guide/our-services/dangerous-goodshazmat/index.html?qgroup=toggle-c1&qid=Ship_Dangerous_Goods
- Dry Ice Weight: The amount of dry ice included in the order at packing time. Must be in kilograms.
Available Services: Select the FedEx shipping options that customers will see during checkout. Note that shipping methods can also be selected at the product level. See Path: Catalog > Products > Edit Product > FedEx Web Services Options tab and when you Generate a Shipping Label.
Configuring FedEx Freight
Note: Miva supports two types of FedEx Freight methods. The first is the standard FedEx Express Freight option, which becomes available automatically once your FedEx account is connected to Miva and requires no additional configuration. For access to additional Freight services, a specialized FedEx Freight Account is required and must be set up through FedEx.
Obtain a FedEx Freight Account
To configure FedEx Freight in Miva, you’ll need a separate FedEx Freight account, distinct from the standard FedEx account you may already use for regular shipping. To set this up, contact your FedEx representative. Once your Freight account is created, you’ll receive a Freight Account Number, which you’ll enter into Miva’s FedEx Freight module.
Configure Methods and Product Settings
The freight shipping settings are configured on its own tab under Shipping Settings -> FedEx Freight Options. Here you can add your new Freight Account Number and configure the default packaging, and default classification.
There are also product specific overrides should each of your products have different packaging or classifications. These are both importable and exportable as a product custom field.