Data Import Settings
Import Settings in Miva’s Data Management feature serves as the main interface for managing data import templates. Here, you can access a variety of CSV and XML templates tailored to different parts of your store, including products, categories, URIs, and more. These templates streamline the process of importing data into the Miva admin, saving time and reducing errors.
You can customize which data fields are included in your downloads and even save your import settings for future use, making repeat imports faster and more consistent.
Path: Settings > Data Management > Import Settings tab
Import Settings Overview
The Import Settings tab in Miva has a list of Data Templates that are used to import bulk data to your store. From here, you can:
Download a template: Configure advanced settings like custom field handling, attribute templates, and variant imports
Create custom import options: Create and save custom import presets for common workflows (e.g., “Add New Products” vs. “Update Products”)
Edit Import Options: Edit default import options like delimiter, field mapping, and header row
For the full import/export process, see: Data Import/ Export Documentation
To learn about creating scheduled tasks for importing data read the Scheduled Task for Importing Data documentation. Click Here.
Important Note:
If you have enable Basket Inventory you may see the following additional fields in some templates:
- Current Stock
- Stock in Baskets
- Total Overall Stock
You should only enter values for Current Stock, which means: inventory on hand that is not in a basket. The other two fields are calculated by Miva Merchant and should be considered read-only.
Path: Settings > Modules > Search Basket Inventory in the Module search bar
Editing Import Options
Select any existing import module from the list on the Import Settings page to open it's settings, in the Edit Import dialog box, you can configure:
Import Mode: Add New Only, Update Only, Replace Only, or Add + Replace
Custom Field Handling: Retain or delete existing data when imported field is empty
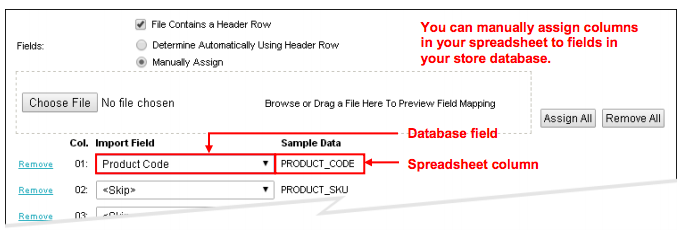
Field Mapping: Assign fields automatically by header row or manually
Attribute Options: For products, choose to use or copy attribute templates
Delimiter / Header Row: Choose your CSV delimiter and whether to skip the header row
Creating Custom Import Options
You can save custom settings for repeated use. In addition to editing the default import options, you can create and save your own.
For example, sometimes when you import products you might want to only add new products; other times you might want to only update existing products. Instead of editing the default import options for products, you can create two customized product imports, one for adding new products and one for updating existing products.
1.Click New Import
2. Description: select a template from the drop down, options include:
Categories
Gift Certificates
Import Data and Settings
Customers
URIs
3. Import Module: Select a settings type from the drop down, options include:
Volume Pricing
Category Import
Coupon Import
Customer Import
Gift Certificate Import
Product Import
XML Provisioning Import
Shipping Import
URI Import
Variant Import
Multi-Domain Import
4. Fill in Import Settings
5. Click Save
Important Note: This does not create a new spreadsheet template. It only saves processing options.
Note: If you are using PR8 Update 9 or later, you can import:
- Attributes
- Options, and
- Variants
To Import Product Variants
Go to Settings > Data Management > Import Settings tab.
In the Import Settings tab, double-click Add/Update Product Variants from CSV.
In the Import Settings tab, single-click Add/Update Product Variants from CSV, and click either the CSV Template button or XLS Template button to download the template.
Add your product variant.
Use the standard process to import your data. See the Data Import/ Export documentation.
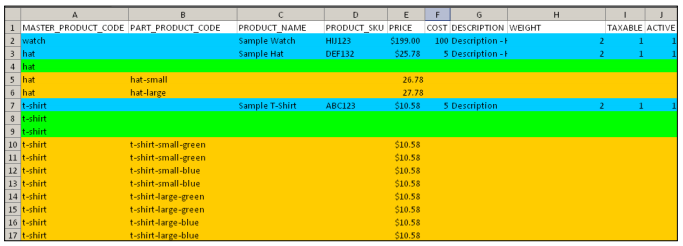
Example template: A sample product variant template with data, rows A-J
In this sample variant template:
The master products are shown in blue: watch, hat, and t-shirt.
The attributes are shown in green:
The master product "watch" has no attributes.
The master product "hat" has one attribute: size.
The master product "t-shirt" has two attributes: size and color
The variants are shown in gold:
- The hat is available in sizes small and large.
- The t-shirt is available in small-green, small-blue, large-green, large-blue.
Notice that, although there are only four different t-shirts, there are eight rows for the t-shirt variants in the spreadsheet. In Miva Merchant, when you create a variant, every attribute has to have an option code and an option prompt. Since our example has two attributes (size and color), it takes two rows to capture this information for each variant:
| Master Product | Part Product Code | Attribute Code | Option Code | Option Prompt |
| t-shirt | t-shirt small green | Size | Small | Small |
| t-shirt | t-shirt small green | Color | Green | Green |
A sample product variant template with data, rows K-P
A sample product variant template with data, rows Q-W
Let's say our t-shirt had three attributes, and two options for each attribute:
- Size: Small, Large
- Color: Blue, Green
- Fabric: Cotton, Synthetic
We would stock six different t-shirts (3 attributes x 2 options). We would need three rows in the spreadsheet for each variant. Our spreadsheet would have a total of eighteen rows for the t-shirt variants: 3 attributes x 2 options each x 3 rows per variant. Here's the data we would need in our spreadsheet for 1 shirt.
| Master Product | Part Product Code | Attribute Code | Option Code | Option Prompt |
| t-shirt | t-shirt small green cotton | Size | Small | Small |
| t-shirt | t-shirt small green cotton | Color | Green | Green |
| t-shirt | t-shirt small green cotton | Fabric | Cotton | Cotton |
Using the Product Variant Template:
You cannot import Attribute template information in your product variant template.
If the master product already exists in your store and you list the master product in your import file, the import process will update the master product in your store with the attribute, option and variant data in your file. If there's a master product in your spreadsheet, but not in your store, the master product will be created in your store.
Using the Product Variant Template
You may have master products where you want to set a customized or "specific" price for each variant. For example, you might have a t-shirt master product with two attributes:
Size: Small, Medium, Large
Color: Green
| Master Product | Variant | Variant Price |
| t-shirt | t-shirt small green | $4.00 |
| t-shirt | t-shirt medium green | $4.50 |
| t-shirt | t-shirt large green | $5.00 |
If you want to import variants with specific prices, your spreadsheet must have data in these columns:
- MASTER_PRODUCT_CODE
- VARIANT_PRICE
- VARIANT_COST
- VARIANT_WEIGHT
Your spreadsheet would look like this (note that we've hidden some columns that don't have required data):
Import Shipment Information from CSV
The Shipment Information template has the following fields:
- Order: the order number.
- Shipment_Code: uniquely identifies a shipment. If you enter a value in this field, the shipment will be marked as shipped in the database.
See Order Processing > Shipments tab > Shipment column for examples of shipment codes.
Tracktype: uniquely identifies a carrier. The tracktype in Miva Merchant is a string associated with an URL.
See Settings > Domain Settings > Shipment Tracking Links tab.
When Miva Merchant sends a tracking number to one of these URLs, the website (such as USPS) will return tracking information that is displayed in the admin interface. In your shipment information spreadsheet you should enter the "Type" that you have configured in Miva Merchant. By default your store comes with four tracktypes.
Tracknum: the tracking number assigned by the carrier.
Cost: the shipping cost quoted by the carrier
Every row in the template is a shipment record. When you import your data, Miva Merchant processes the records in the following way:
Saving Import Options
When you import your data file you should select the import options that will affect how the data is processed. There are two ways to do this:
- Edit the default Import Options: Go to Settings > Data Management > Import Settings and select a template. In the Import Options dialog box, make any changes that you want, then click Save.
- Create and save your own import options:
To Create and Save Import Options:
It's important to note that the Add Import dialog box does not create a new spreadsheet template. This dialog box only allows you to select some processing options and save those options under a name.
Under Import Settings click New Import
In the Add Import dialog box, select the processing options:
1. Description: enter a name for the saved options, for example: "Product Import - New Products Only"
2. Import Module: This is the type of spreadsheet template you will be downloading and using. The options are:
3. Categories/Customers/Products:
- Add New < . . . > Only: Any categories/customers/products in your spreadsheet that already exist in the database will be ignored during import.
- Update Existing < . . . > Only: Any categories/customers/products in your spreadsheet that do not already exist in the database will be ignored during import. Update will ignore empty columns in your spreadsheet. If you have a blank column in your spreadsheet, Update will leave the existing value for that column in your store database alone.
- Add New and Update Existing < . . . >: All new and existing data in your spreadsheet will be imported. Update will ignore empty columns in your spreadsheet. If you have a blank column in your spreadsheet, Update will leave the existing value for that column in your store database alone.
- Replace Existing < . . . > Only: Any new categories/customers/products in your spreadsheet will be ignored during import. Replace pays attention to blank columns in your spreadsheet. If you have a blank column in your spreadsheet, Replace will delete that value from your store database.
- Add New and Replace Existing < . . . >: All new and existing data in your spreadsheet will be imported. Replace pays attention to blank columns in your spreadsheet. If you have a blank column in your spreadsheet, Replace will delete that value from your store database.
4. Custom Fields: The options, "Retain Existing Data When Imported Data is Empty" and "Delete Existing Data When Imported Data is Empty" only apply to custom fields that you have:
5. Created in your database Settings > Utilities > Custom Fields tab, and added to your spreadsheet.
6. Attribute Templates (Product import only): If you are using a Product spreadsheet, it will contain a column called "attribute_template_code". If you have already created an Attribute template, you can add the template to a product in your spreadsheet by filling out the Attribute Template Code column.
- Use Attribute Template Codes: This has the same effect as selecting an Attribute Template from the Catalog > Product > Attributes tab > Add Attribute button >Type drop-down list. The attribute will be assigned to the product, but to modify the attribute you must change the Attribute Template.
- Copy Attribute Template Values: This has the same effect as selecting the Edit Product > Attributes tab > Add Attribute button > Copy? checkbox. The attribute will be copied from the Attribute Template and applied to the product. Changing the Attribute Template will not affect the product. The attribute can only be changed by editing it in the Edit Product >Attributes tab.
7. Delimiter: The field delimiter that you are going to use in your spreadsheet
8. File Contains a Header Row: Check this box to have the import process ignore the first row in your spreadsheet.
9. Fields:
- Determine Automatically Using Header Row: If you select this field the import process will examine the column headings in your spreadsheet and figure out what fields in the database they represent. This is the appropriate option for most users if you have not changed the column names in the spreadsheet that you downloaded. Note that the order of columns doesn't matter, so if you have changed the column order, but not the column names, you can still use this option.
-
Manually Assign: Use this option if you have changed the column names in your spreadsheet.
- Click on the Choose File button to load your spreadsheet from your local machine.
- Use the Import Field drop-down list to select a field from the database.
Important note when using Basket Inventory Module:
If you have enable Basket Inventory you may see the following additional fields in some templates:
- Current Stock
- Stock in Baskets
- Total Overall Stock
You should only enter values for Current Stock, which means: inventory on hand that is not in a basket. The other two fields are calculated by Miva Merchant and should be considered read-only.
Path: Settings > Modules > Search Basket Inventory in the Module search bar
Create and Save Two Product Import Settings
Let's say you have a very busy store and you would like to routinely upload two spreadsheets:
- New products only.
- Changes to existing products only.
Step 1: From Import Settings, Click New Import.
Step 2: Use the Add Import dialog box to create and save the following two settings
Setting 1: Product Import- New Products Only
Setting 2: Product Import- Updated Products Only
Step 3: After you create and save them both, you'll see them in the Import Settings tab:
Note: Both of these settings download the same product template. One is designed to update existing products, the other is intended to create new products in the Miva Catalog.