Template Branches Overview
The Template Branches functionality is located within the User Interface Navigation Menu. Selecting the current branch name will display all branches and options to create a branch and the Branch Manager dialog.
On this Page
- Changesets
- Manage Branches
- Tags
- Miva Command Line Tool
- MMT Commands
- Developer Workflows
Changesets
A changeset is one single value in the stack of changes that are being made on a codebase.
Manage Branches
When a record is selected the options to Make Working Branch is available along with exporting a CSV, In-Line Edit, Make Primary Branch, Copy Branch Preview URL, and Delete Branch when the action list items are selected.
When the Add Branch button is selected the Create Branch dialog will appear. Here adding the Branch name, choosing the icon color and Copy From template then selecting the create button will create a new template branch.
Copy Branch
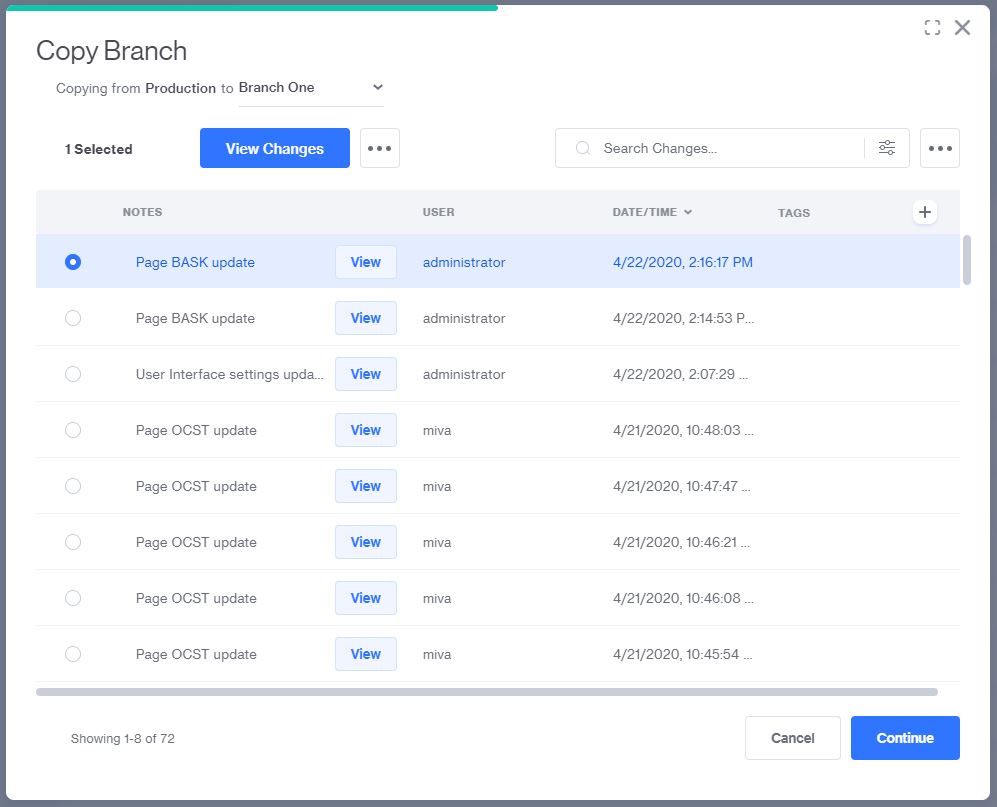
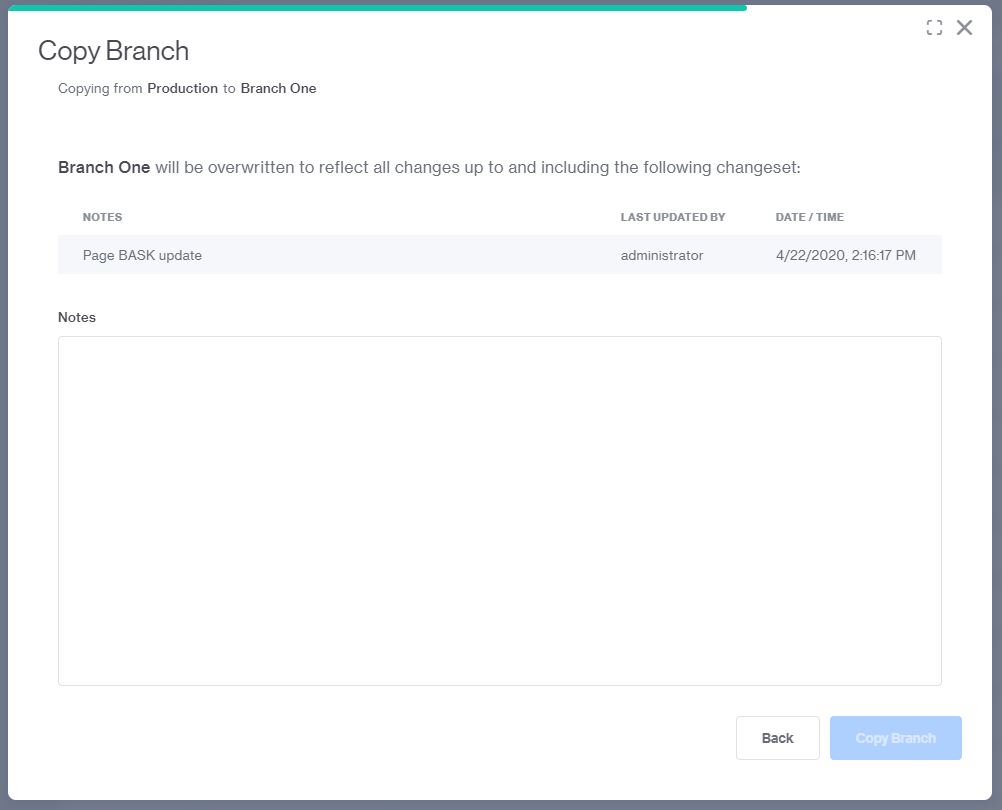
When Copy is selected from the batch menu action icon the Copy Branch dialog appears and contains a wizard to help copy the current branch to any branch.
Step One: Select Branch
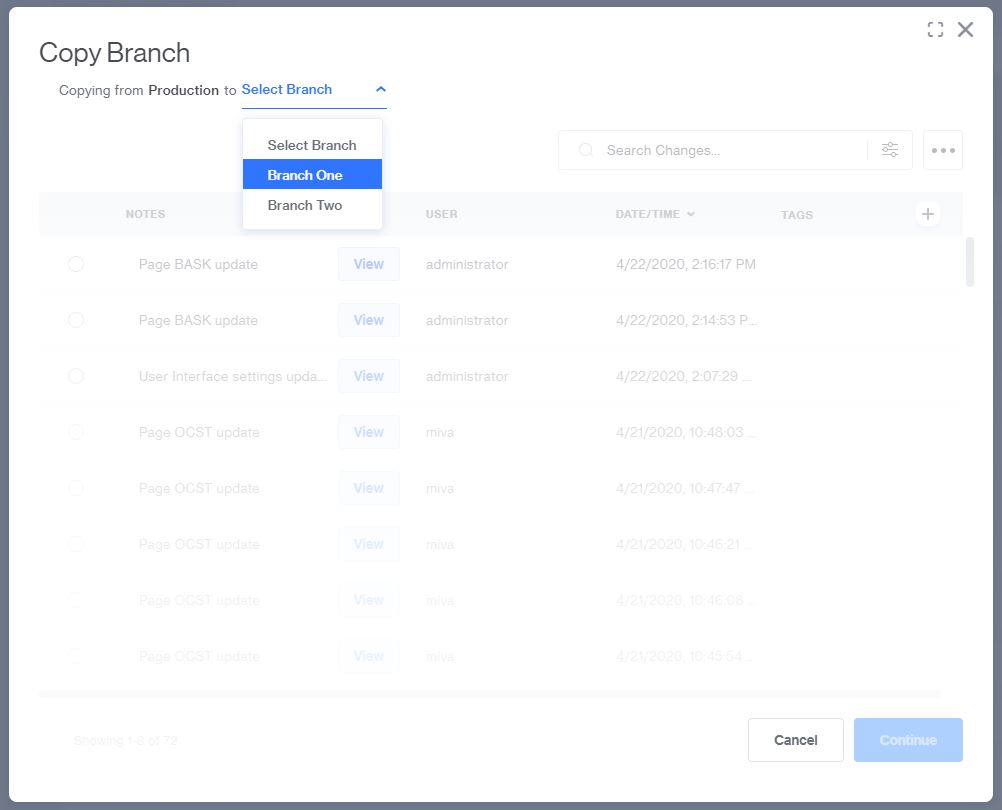
Step Two: Select Changeset
Step Three: Add Notes and Commit
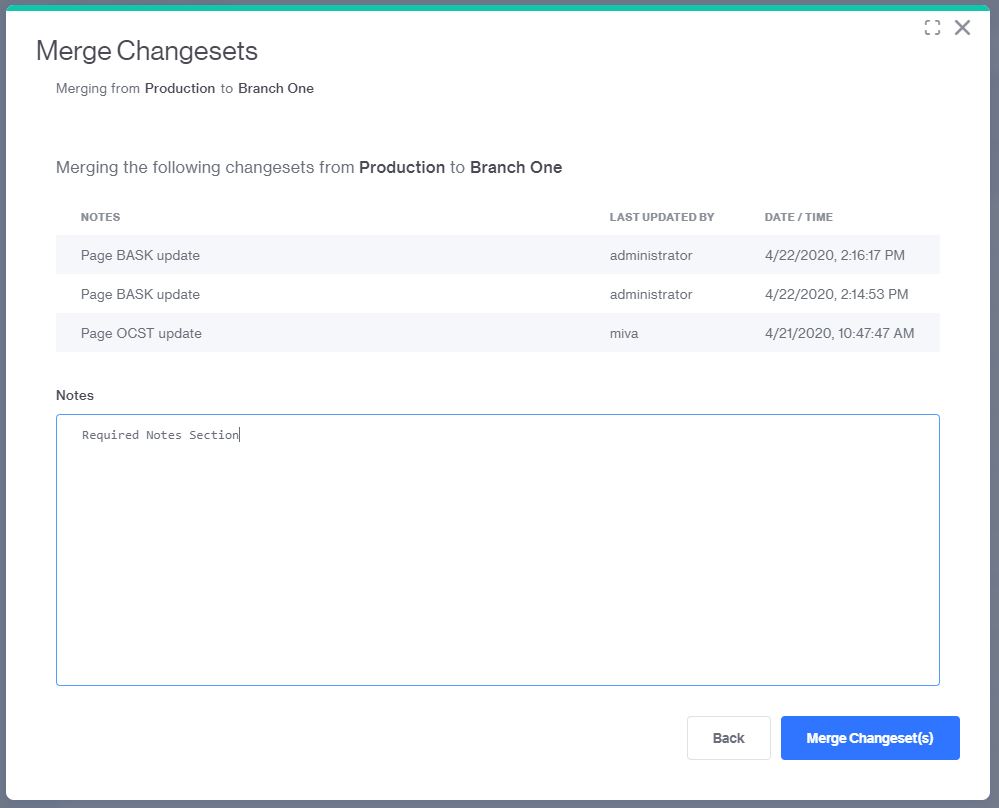
Merge Changesets
When Merge is selected from the batch menu action icon the Merge Changesets dialog appears and contains a wizard to help merge any changesets in the current branch to another branch.
Step One: Select Branch
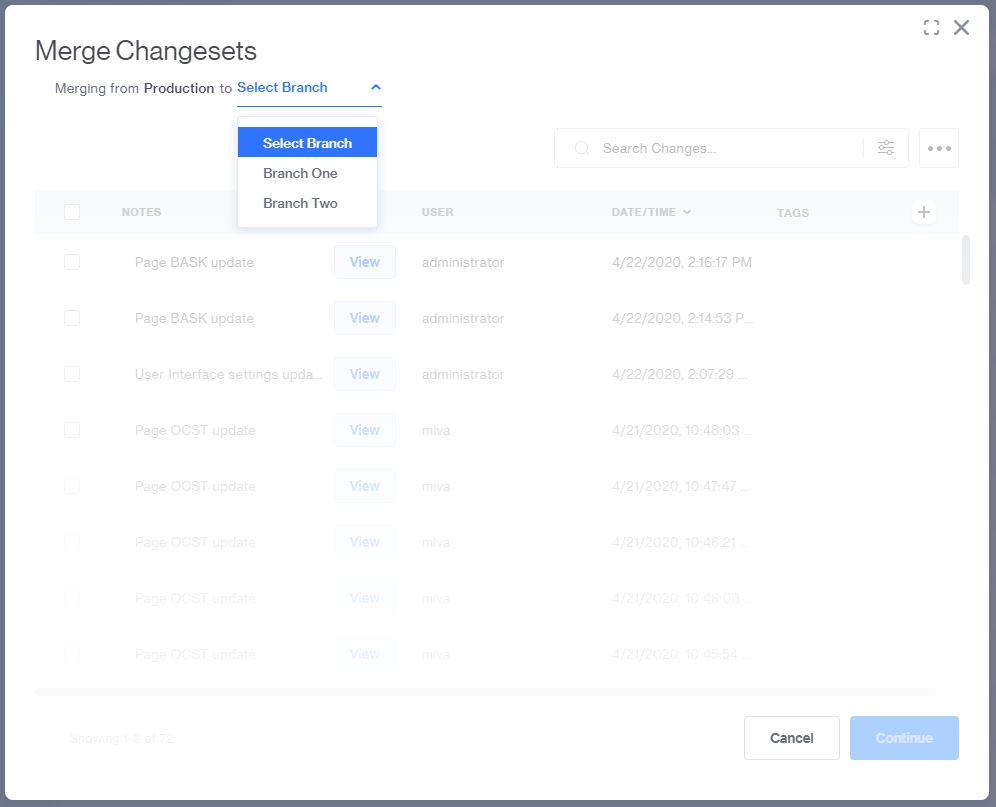
Step Two: Select Changeset
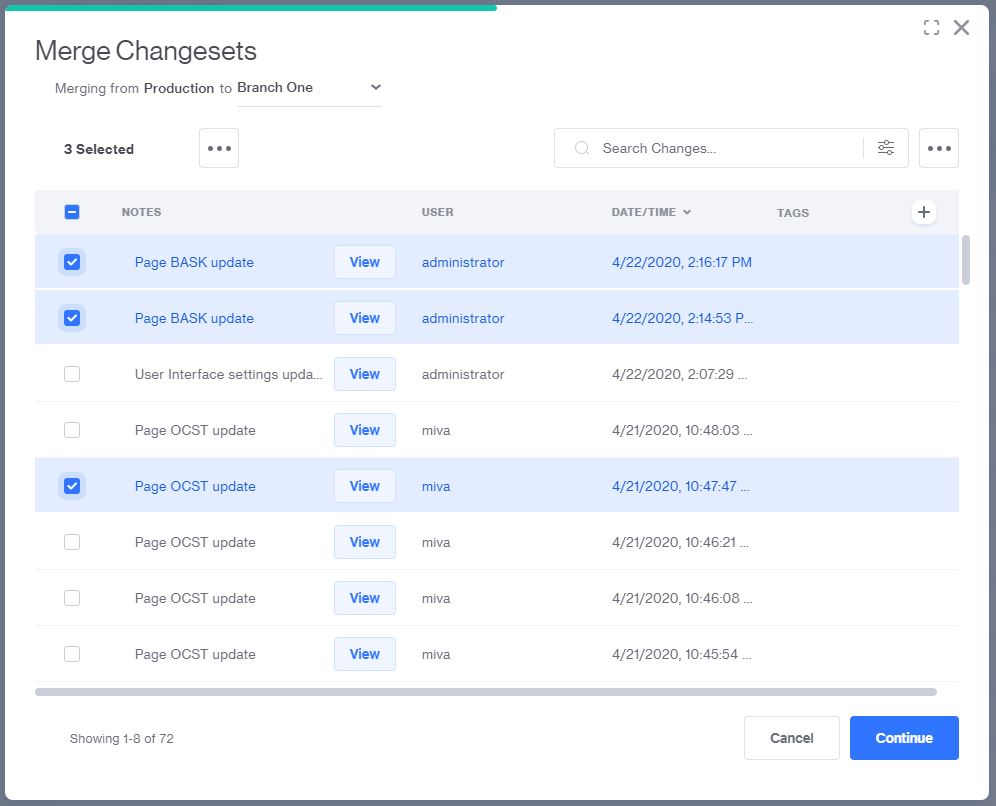
Step Three: Add Notes and Commit
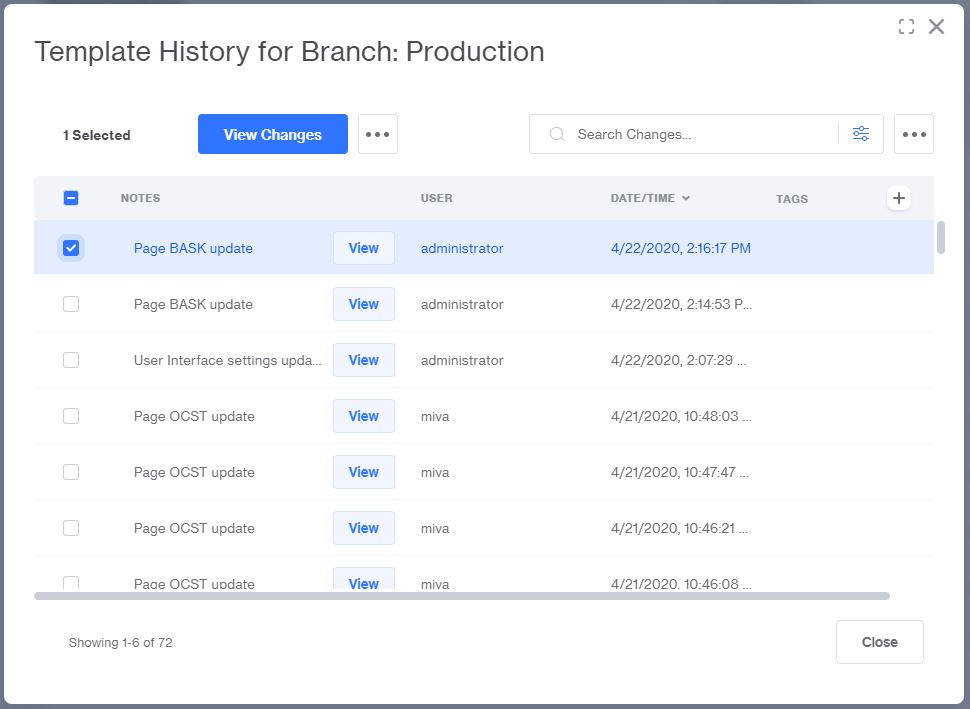
Branch History
When History is selected from the batch menu action icon the History dialog appears where changes can be selected individually and viewed. Changesets can also be reveret from this menu by selecting the record and choosing Revert.
Note : Template Branches are particularly useful when using PageBuilder. For additional information on how template branches can be used with PageBuilder, click here .
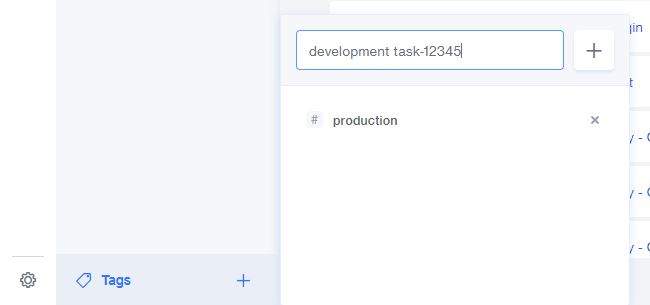
Tags
Tags can be found at the bottom of the User Interface Navigation Menu with a flyout menu when selected. Here all tags can be viewed and removed as well as added, multiple tags can be added by using a space between words.
Miva Command Line Tool
Miva Command Line Tool is a comprehensive command line interface tool to help speed up the development process within the Miva software. Once the Miva Command Line Tool is set up locally, global credentials are created using either an API Token or SSH credentials configured in Miva. Using the credentials a remote key will be created to link the local directory with a template branch in the store. After the initial setup is complete template branch assets can be pulled, pushed, updated, and reverted using the core commands. Other useful commands are available like diff, switch, status, log and even a command to create new branches on the store. Learn More
Installation
To install run the following command and add the install directory to
your path.
Prerequisites include having python (3.6 or higher) and pip installed
locally.
Project Repository https://pypi.org/project/miva-mmt/
pip3 install --user miva-mmt
To install with elevated privileges and run, which will install the tool for everyone on the local machine.
pip3 install miva-mmt
To update run the following command.
pip3 install --upgrade miva-mmt
Rollback Procedure.
pip3 uninstall miva-mmt
pip3 install miva-mmt==1.0.2
Token Authentication
To create token credential type within the Miva Command Line Tool an API Token will need to be created within the Miva admin.
Navigate to
Settings
>
User Management
>
API Tokens
. Select
Add API Token
button.
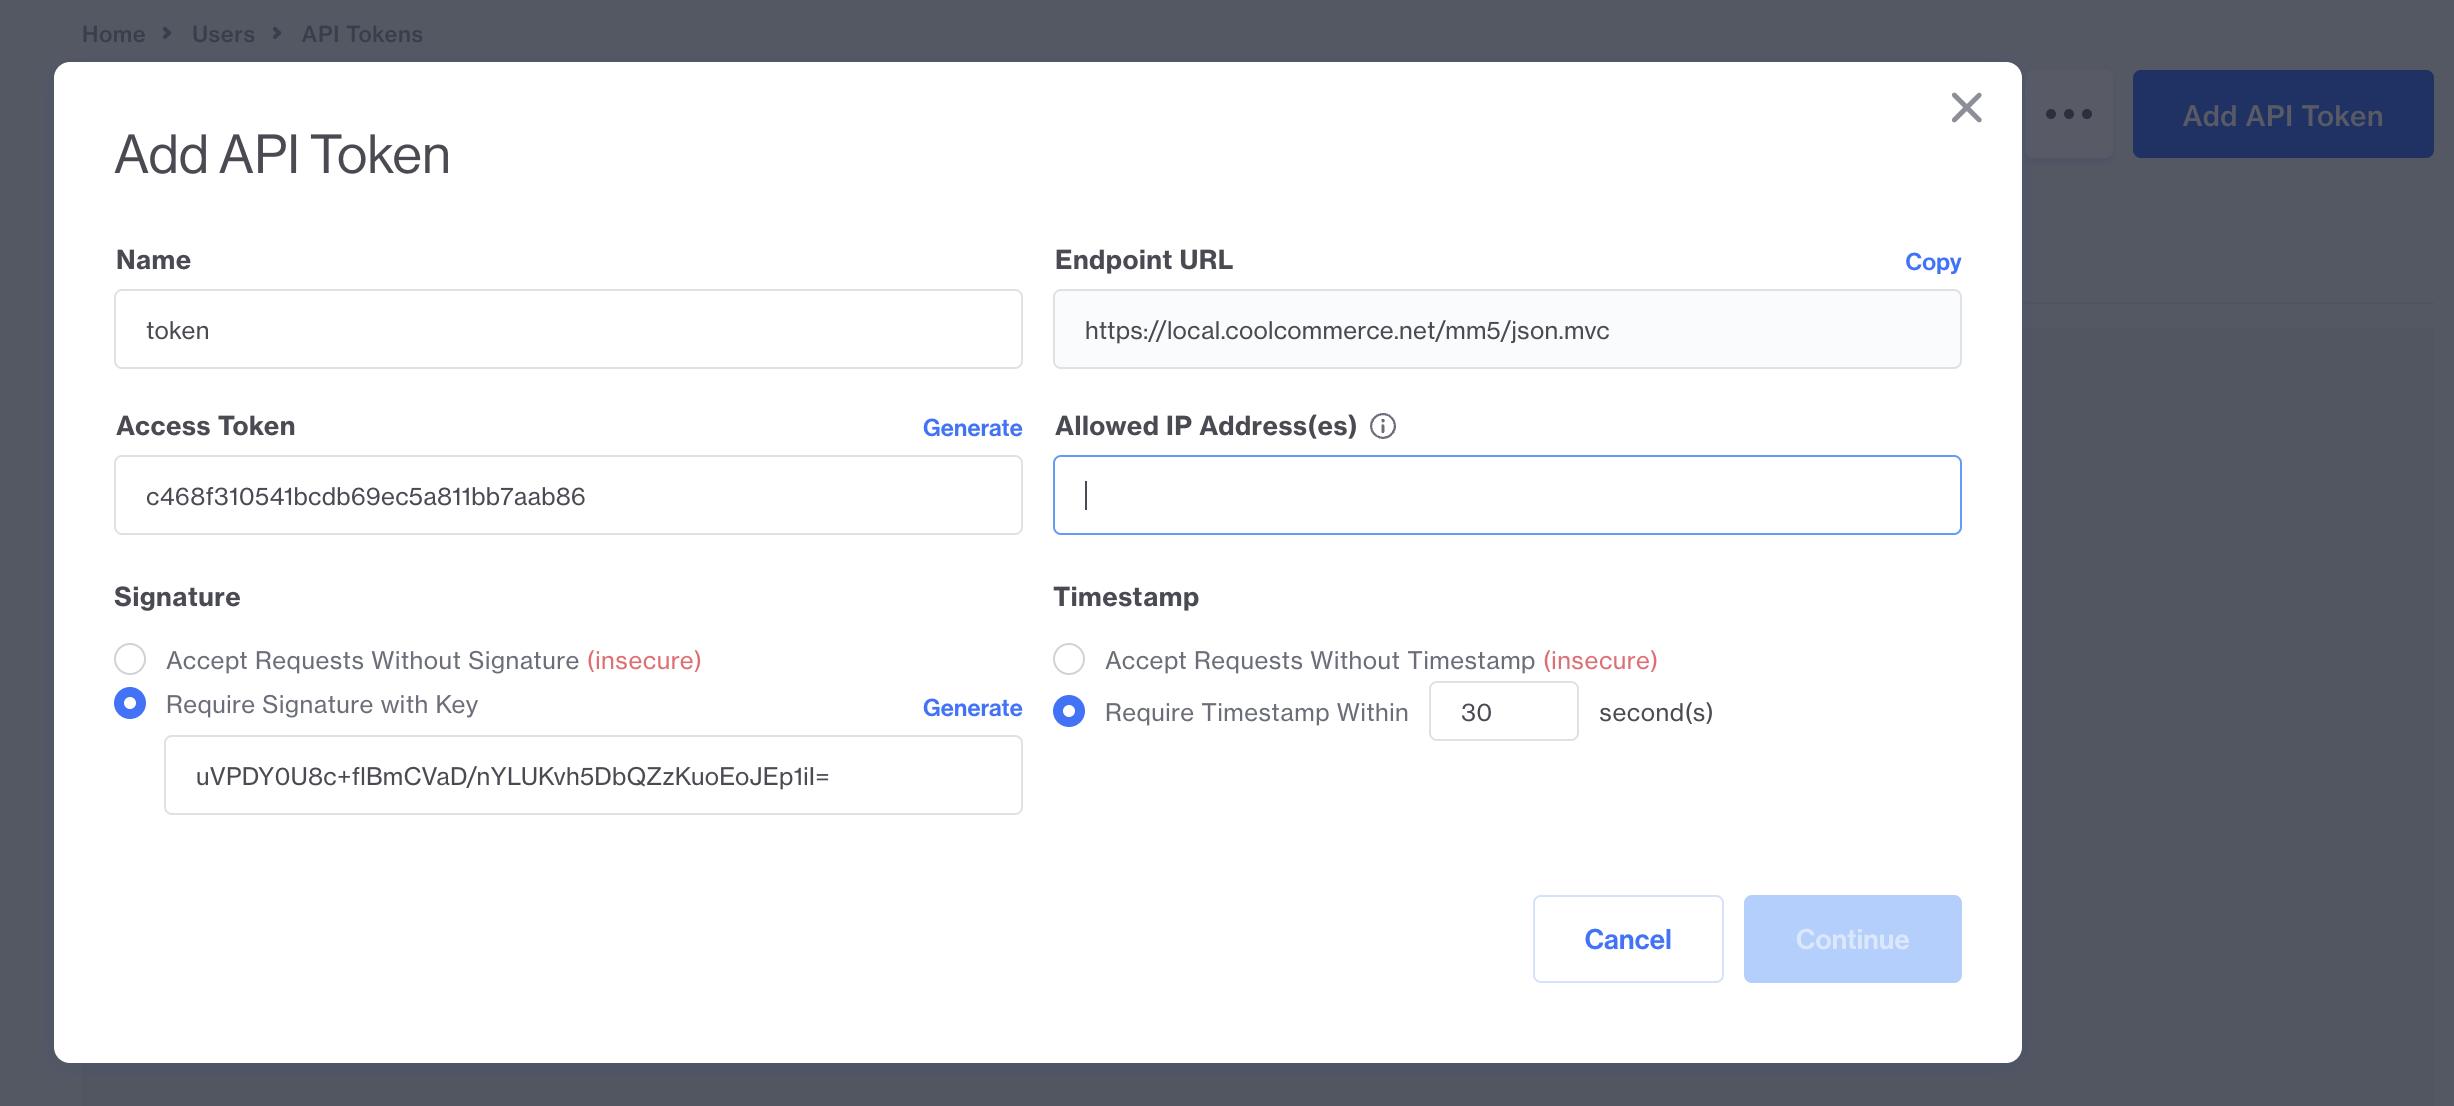
Name
: Required to create a token
Access Token
: Need to set up credential in the Miva Command LineTool
Allowed IP Address(es)
: Each access token is restricted to a list of IP addresses you want
to have access to make API calls. It accepts a comma separated list of
IPs. If you don't have static IP addresses, you can disable it by using
0.0.0.0/0 which will allow any IP address. You may also need to whitepst
the short hand for ipv6 whcih is: ::/0
Signature
:This is required for the Miva Command Line Tool and will be used when
setting up a credential.
Timestamp
: The command line tool will work with either Timestamp option selected
as it automatically adds the timestamp, but it is recommend to require
it for security purposes.
Click Continue to create the API Token. The next page that pops up is where you will assign groups to the Token, the User Interface group
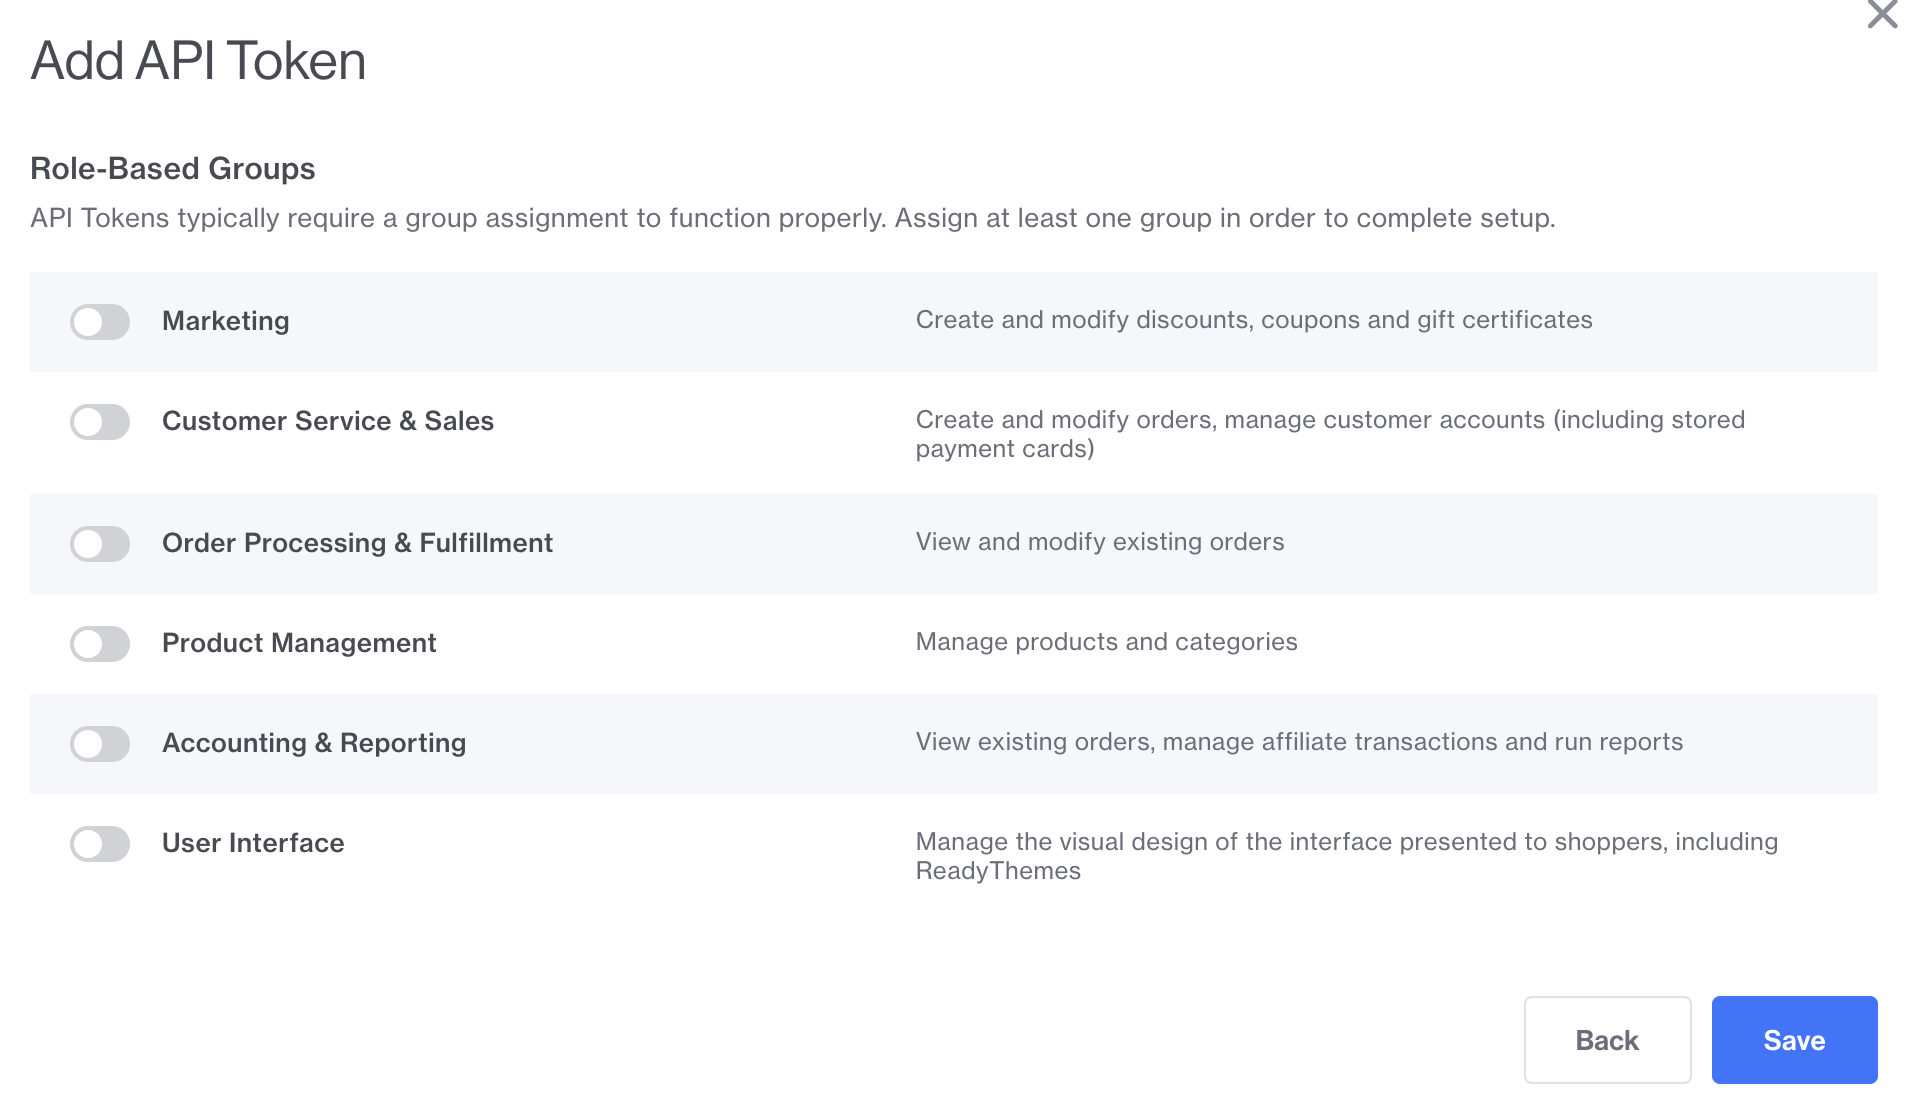
To edit an API Tokens, Groups, or assign Functions click on the name of the API Tokens on the API page. For more information see the API Token Guide in Miva Docs.
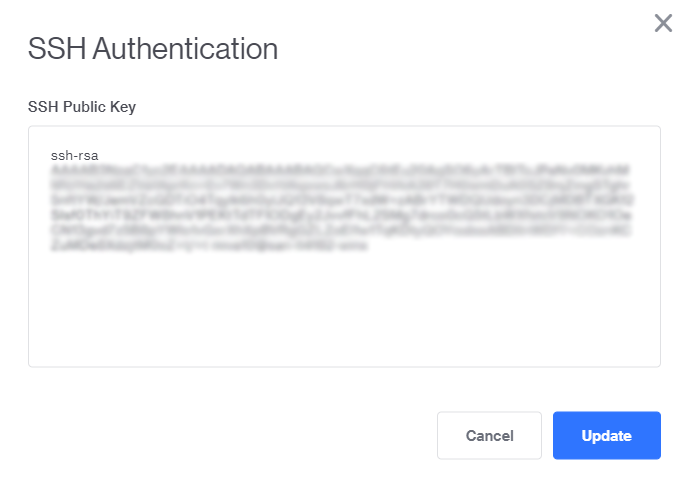
SSH Authentication
In order to use an SSH credential type a public and private key must be generated. Miva only supports "ssh-rsa" format SSH Keys and not DSA, ed25519 or ECDSA. One way to generate an SSH key in the command line interface is to use:
$ ssh-keygen -t rsa -m pem
This will generate both a public and private key file on the local device. The public key file will have a ".pub" extension and this value should be copied into the Miva user under: Edit Profile -> Manage SSH Authentication. Keep note of the private key path as that will be needed when setting up the ssh credential type within the command line tool.

MMT Commands
Infomational Commands
mmt --debug
By passing this optional argument on any command all the requests and responses will output in the terminal window.
Usage
  $ mmt -d
$ mmt --debug
mmt --help
By running this optional argument a list and information about all the subcommands will be displayed
Usage
  $ mmt -h
$ mmt --help
mmt --version
By running this command the MMT version will be display
Usage
  $ mmt -v
$ mmt --version
mmt info
Outputs information about a local MMT directory
Usage
$ mmt info [-h] [path]
Positional Arguments
  path
// The path of the directory
Optional Arguments
  -h, --help
// Show help message and exit
Output
  Remote
Key: KEY_NAME
Store Code: STORE_CODE
Branch Name: BRANCH_NAME

Credential
Key: KEY_NAME
URL: https://domain_name.com/mm5/json.mvc
Method: Token/SSH
Token/UserName: TOKEN_VALUE/SSH_USERNAME

Branch
Name: BRANCH_NAME
Key: BRANCH_KEY
Tags: <None>Changeset
ID: ID_VALUE
Username: USERNAME
Notes: NOTES
mmt log
Lists the changes made to a specific changeset or to a group of changesets
Usage
$ mmt log [-h] [-c C | -C C] [-v] [path]
Positional Arguments
  path
// The path to the directory
Optional Arguments
  -h, --help
// Show help message and exit

-c C
// Get the changes since a specific changeset

-C C
// Get the changes for a specific changeset

-v, --verbose
// Include a list of modified files within each changeset
mmt status
Lists files that have been locally modified
Usage
$ mmt status [-h] [path]
Positional Arguments
  path
// The path to the directory
Optional Arguments
  -h, --help
// Show help message and exit
Value Output
No Files Modified
mmt diff
Diff files that have been locally modified
Usage
$ mmt diff [-h] [filenames [filenames ...]]
Positional Arguments
  filepaths
// The list of local files to diff. If blank, all locally modified files will be diffed
Optional Arguments
  -h, --help
// Show help message and exit
Configurable Commands
mmt config
Configure settings
Usage
$ mmt config [-h]
mmt config list
List value of saved configuration settings
Usage
$ mmt config list [-h]
Output
diff: <Not Set>editor: <Not Set>
mmt config set
Set a configuration setting (valid values include 'diff, editor').
Usage
$ mmt config set [-h] key value
Positional Arguments
  key
// Name of the configuration setting (valid values include 'diff, editor')
value
// Value of the configuration setting
VS Code Editor Example
$ mmt config set editor /usr/local/bin/code -- -w
The –wait or -w is a command specific to VS Code to tell the editor to wait until the file is closed before continuing. Different editors may have their own flags like this.
mmt config delete
Delete configuration setting
Usage
$ mmt config delete [-h] key
Positional Arguments
  key
// Name of the configration setting
mmt tag
List, add, set, or delete the branch tags
Usage
$ mmt tag [-h]
Optional Arguments
  -h, --help
// Show  help message and exit
mmt tag SubCommands
mmt tag list
List tags
Usage
$ mmt tag list [-h]
Output
#TAG_NAME
mmt tag add
Add one or more tags
Usage
$ mmt tag add [-h] tags [tags ...]
Positional Arguments
  tags
// The tags to be added
Optional Arguments
  -h, --help
// Show help message and exit
mmt tag set
Overwrite existing tags
Usage
$ mmt tag set [-h] tags [tags ...]
Positional Arguments
  tags
// The tags to be set
Optional Arguments
  -h, --help
// Show help message and exit
mmt tag delete
Delete one or more existing tags
Usage
$ mmt tag delete [-h] [--all] [tags [tags ...]]
Positional Arguments
  tags
// The tags to be deleted
Optional Arguments
  -h, --help
// Show help message and exit

--all
// Delete all existing tags
mmt credential
Store credentialsUsage
$ mmt credential [-h]
mmt credential list
List values of all saved credential keys.
Usage
$ mmt credential list [-h]
Output Values
Name, Method, URL, Token, Username, Filepath
mmt credential add
Add a credential
Usage
$ mmt credential add [-h] [-h] --url URL [--http-basic-auth-username HTTP_BASIC_AUTH_USERNAME] [--http-basic-auth-password HTTP_BASIC_AUTH_PASSWORD] [--token TOKEN] [--signing-key SIGNING_KEY] [--ssh-username SSH_USERNAME] [--ssh-private-key SSH_PRIVATE_KEY] key
Positional Arguments
  key
// The name of the credential key
Optional Arguments
  -h, --help
// Show help message and exit

--url URL
// The API URL where API will requests will be sent

--http-basic-auth-username HTTP_BASIC_AUTH_USERNAME, -m HTTP_BASIC_AUTH_USERNAME
// HTTP Basic Authentication username

--http-basic-auth-password HTTP_BASIC_AUTH_PASSWORD, -w HTTP_BASIC_AUTH_PASSWORD
// HTTP Basic Authentication password (if the username argument is present and the password
argument is omitted, you will be prompted for the password)

--token TOKEN
// The API token used to make API requests

--signing-key SIGNING_KEY
// The API signing key used to sign API requests

--ssh-username SSH_USERNAME
// The Miva Merchant username associated with the SSH credential

--ssh-private-key SSH_PRIVATE_KEY
// The filepath to the SSH private key
mmt credential update
Update a credential
Usage
$ mmt credential update [-h] [--credential-key CREDENTIAL_KEY] [--url URL] [--http-basic-auth-username HTTP_BASIC_AUTH_USERNAME] [--http-basic-auth-password HTTP_BASIC_AUTH_PASSWORD] [--token TOKEN] [--signing-key SIGNING_KEY] [--ssh-username SSH_USERNAME] [--ssh-private-key SSH_PRIVATE_KEY] key
Positional Arguments
  key
// The key to associate the credential with
Optional Arguments
  -h, --help
// Show help message and exit

--credential-key CREDENTIAL_KEY
// The new credential key value

--url URL
// The API URL where API will requests will be sent

--http-basic-auth-username HTTP_BASIC_AUTH_USERNAME, -m HTTP_BASIC_AUTH_USERNAME
// HTTP Basic Authentication username

--http-basic-auth-password HTTP_BASIC_AUTH_PASSWORD, -w HTTP_BASIC_AUTH_PASSWORD
// HTTP Basic Authentication password (if the username argument is present and the password argument is omitted, you will be prompted for the password)

--token TOKEN
// The API token used to make API requests

--signing-key SIGNING_KEY
// The API signing key used to sign API requests

--ssh-username SSH_USERNAME
// The Miva Merchant username associated with the SSH credential

--ssh-private-key SSH_PRIVATE_KEY
// The filepath to the SSH private key
mmt credential delete
Delete a credential
Usage
$ mmt credential delete [-h] key
Positional Arguments
  key
// Delete credential associated with the key
Optional Arguments
  -h, --help
// Show help message and exit
mmt remote
Configure a remote resource
Usage
mmt remote [-h]
mmt remote list
List remote resources
Usage
$ mmt remote list [-h]
Optional Arguments
  -h, --help
// Show help message and exit
Output Values
  REMOTE_KEY
    Credential Key: CREDENTIAL_KEY
    Store Code: STORE_CODE
    Branch Name: BRANCH_NAME
mmt remote add
Add a remote resource
Usage
  $ mmt remote add [-h] --credential-key CREDENTIAL_KEY
--branch-name BRANCH_NAME --store-code STORE_CODE key
Positional Arguments
  key
// The key of the remote resource
Optional Arguments
  -h, --help
// Show help message and exit

--credential-key CREDENTIAL_KEY
// The key associated with the stored credential

--branch-name BRANCH_NAME
// The branch name to checkout

--store-code STORE_CODE
// The store code from which to checkout
mmt remote update
Update a remote resource
Usage
  $ mmt remote update [-h]  [--remote-key REMOTE_KEY] [--credential-key CREDENTIAL_KEY]
[--store-code STORE_CODE] [--branch-name BRANCH_NAME] key
Positional Arguments
  key
// The key of the remote resource
Optional Arguments
  -h, --help
// Show help message and exit

--remote-key REMOTE_KEY
// The new remote key value

--credential-key CREDENTIAL_KEY
// The key associated with the stored credential

--store-code STORE_CODE
// The store code associated with the remote resource

--branch-name BRANCH_NAME
// The branch name associated with the remote resource
mmt remote delete
Delete one or more remote resources
Usage
$ mmt remote remote delete [-h] key [key ...]
Positional Arguments
  key
// Delete remote resources associated with the key
Optional Arguments
  -h, --help
// Show help message and exit
Core Commands
mmt branch
Create, delete or list branches
Usage
$ mmt branch [-h]
Optional Arguments
  -h, --help
// Show help message and exit
mmt branch list
List all branches
Usage
$ mmt branch list [-h] --credential-key CREDENTIAL_KEY --store-code STORE_CODE
Optional Arguments
  -h, --help
// Show help message and exit

--credential-key CREDENTIAL_KEY, -c CREDENTIAL_KEY
// The key associated with the remote resource

--store-code STORE_CODE, -s STORE_CODE
// The store code
Value Output
  Branch: BRANCH_NAME
Is Primary: True/False
Is Working: True/False
Preview URL: https://DOMAIN_NAME.com/storefront.html?BranchKey=BRANCH_KEY
mmt branch create
Create a branch
Usage
  $ mmt branch create [-h] [--color COLOR] --from FROM --store-code STORE_CODE
--credential-key CREDENTIAL_KEY --remote-key REMOTE_KEY name
positional Arguments
  name
// The branch name
Optional Arguments
  -h, --help
// Show help message and exit

--color COLOR, -c COLOR
// The color used to identify the new branch in the Administrative Interface

--remote-key REMOTE_KEY, -r REMOTE_KEY
// The key associated with the stored remote resource
// Use a Remote Key to automatically derive the credential key, store code, and parent branch name

--from FROM, -f FROM
// The branch name from which to create a new branch from

--store-code STORE_CODE, -s STORE_CODE
// The store code

--credential-key CREDENTIAL_KEY, -c CREDENTIAL_KEY
// The key associated with the stored credential
mmt branch delete
Delete a branch
Usage
$ mmt branch delete [-h] --credential-key CREDENTIAL_KEY --store-code STORE_CODE name
positional Arguments
  name
// The branch name
Optional Arguments
  -h, --help
// Show help message and exit

--credential-key CREDENTIAL_KEY, -c CREDENTIAL_KEY
// The key associated with the stored credential

--store-code STORE_CODE, -s STORE_CODE
// The store code
mmt checkout
Checkout a branch
Usage
$ mmt checkout [-h] [-c C] [--ignore-unsynced-templates] [--ignore-unsynced-properties] [--reinitialize] remote-key [path]
Positional Arguments
  remote-key
// The key associated with the stored remote resource

path
// The path where the checked out branch should be created
Optional Arguments
  -h, --help
// Show help message and exit

-c C
// Checkout a specific changeset

--ignore-unsynced-templates, -t
// Used to exclude templates
	// Email Templates / Email settings
	// Product/Category Headers & Footers
	// Page Header/Footers

--ignore-unsynced-properties, -p
// Used to exclude all properties

--reinitialize, -z
// Reinitialize the state file to the specified changeset. Files that do not exist are added while files that already exist are left unmodified.
mmt pull
Update local files to remote server's version
Usage
$ mmt pull [-h] [-c C] [--force] [filepaths [filepaths ...]]
Positional Arguments
  filepaths
// The list of local files to update. If blank, all files within the checked out changeset / the specified changeset will be updated
Optional Arguments
  -h, --help
// Show this help message and exit

-c C
// Update to specified changeset

--force, -f
// Overwrite any locally modified files
mmt push
Commit and push the local files to the remote server
Usage
$ mmt push [-h] [--notes NOTES] [filepaths [filepaths ...]]
Positional Arguments
  filepaths
// The list of local files to commit and push. If blank, all locally modified files will be committed
Optional Arguments
  -h, --help
// Show help message and exit

--notes NOTES, -n NOTES
// Notes describing the changes to be committed
mmt revert
Revert files that have been locally modified
Usage
$ mmt revert [-h] [--all] [filenames [filenames ...]]
Positional Arguments
  filepaths
// The list of local files to revert
Optional Arguments
  -h, --help
// Show help message and exit

--all, -a
// Revert all files
mmt switch
Switch to a new remote source
Usage
$ mmt switch [-h] remote-key
Positional Arguments
  remote-key
// The key associated with the stored remote resource
Optional Arguments
  -h, --help
// Show help message and exit
Developer Workflows
Download Locally
- Create new development template branch
- Download UI (Templates, CSS, JS, Theme Components) locally
- Make changes locally, push up changes to development template branch to preview
- Push to Git/Subversion [Code repo becomes the master for all templates]
- If multiple developers, they repeat steps 1-4 themselves and push to repository
- Merge all code into code repository / Handle merge conflicts
Deploy Code To Production
- Create new staging template branch & download UI locally
- Overwrite UI with master from code repository
- Push up to staging template branch and QA
- Deploy to primary template branch via Miva admin using merge, copy or swap
Note: The following things need to be done manually in admin
- New CSS/JS files
- New Page Templates
- New Theme Component
- New Item Assignments
Template Branches & Miva Command Line Tool
Miva 10 has introduced several powerful and extremely useful tools to help merchants sell more and easier. Version 10 also included the addition of the largest feature released to date, Template Branches. A whole new set of developer tools to promote quick, accurate, and effective development. The new Template Branches feature combined with Miva Command Line Tool will reduce the development and launch time as well as many other developer-focused benefits.
Sign Up to Take Course
To sign up for the course, visit https://www.miva.com/mivalearn